
Overview
- Kayenta is an open source automated canary analysis tool used to evaluate the readiness for production of a new version of a software.
- Kayenta is based on a tool developed internally by Netflix, and it was integrated with Google’s help into Spinnaker to perform automated canary release across multiple clouds.
- The new software version that is analyzed for readiness can contain code changes and/or configuration tweaks.
How does Kayenta work with Spinnaker?
- A canary release is a technique to reduce the risk from deploying a new version of software into production.
- Canary analysis is a way to use automation to detect issues with the new software using the metrics generated by the new application and comparing to the current production version.
- Netflix and Google has teamed up to release an open source version of this analysis tool called Kayenta and make it available as part of the Spinnaker project.
Steps to enable Kayenta for Spinnaker
- Kayenta supports the following monitoring services – Stackdriver, Prometheus and Datadog. We can deploy Kayenta to Kubernetes running on cloud.
- In our case, we have Spinnaker instance deploying to Kubernetes running on cloud. Prometheus is the monitoring service used for service level metrics monitoring (Tomcat service).
Steps to Enable Canary
- Ensure to have the latest version of Spinnaker is installed on the server.
- hal config version
- Execute the below command, to enable canary analysis for all the applications
- hal config canary enable
Steps to Enable Storage for Canary
- Canary needs a storage account to store the canary data such as canary configurations and time series data retrieved from metric stores.
- Note: Use any Existing Bucket, or else try in creating a new Bucket.
- Enable the default storage account with the following command.
hal config canary google account add my-google-account \
–project $PROJECT_ID \
–json-path $JSON_PATH \
–bucket $MY_SPINNAKER_BUCKET
Steps to Enable Prometheus Monitoring Service Integration
- Now, we will enable Kayenta to be able to read Prometheus metric store. Authentication for prometheus is not enabled in the given example. However, it can be setup easily if authentication at Prometheus is enabled.
- Use the following command to enable Prometheus metric store.
- hal config canary prometheus enable
- hal config canary prometheus account add ACCOUNTName –base-url ENDPointOfPrometheus
- For Example: hal config canary prometheus account add prometheus-account –base-url http://a23f9cc3537ee12345678910-655574421.us-east-2.elb.amazonaws.com:9090
- hal config canary edit –default-metric-account ACCOUNTName
- For Example: hal config canary edit –default-metrics-store prometheus –default-metrics-account prometheus-account
How does a Canary Config function?
- Overview
- A service that could be collecting a large number of metrics. Which can also come from multiple sources like Cloudwatch for load balancers and Prometheus for service metrics.
- Likewise, Canary config allows users to select KPI or subset of metrics from one or more sources, group them in logical fashion and customize weights to each of the groups to compute a canary score.
Steps to Enable Canary Config
- Login to Spinnaker Console & Click on canary config page under delivery tab on application tab.

- Now, click on ‘Add Configuration’, ‘Add configuration name and description’.
- Click on ‘Add Metric’, which will result in a pop-up as shown below
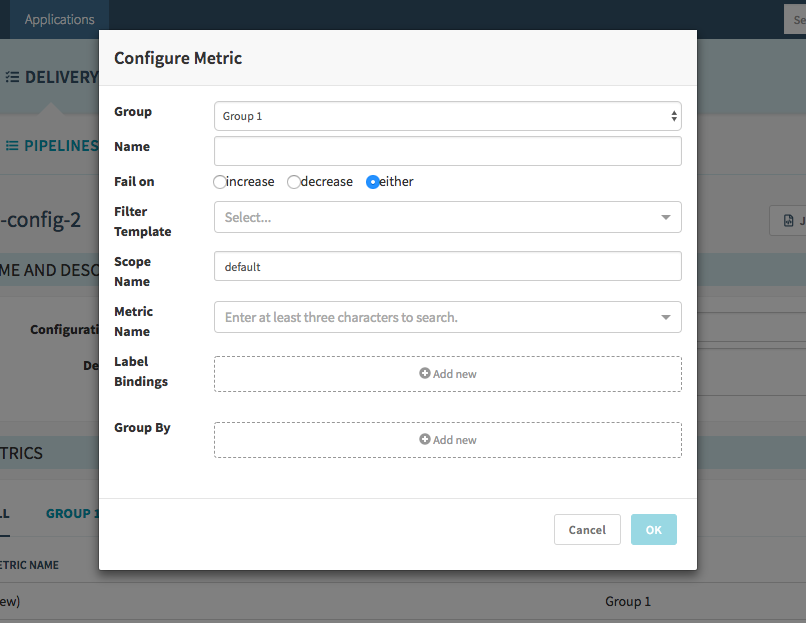
- Now, Add Name and Metric name.
- We need to add filter template in case of kubernete cluster because pod names are saved in the format – container_label_{your pod name} in prometheus server.
- So for the filter template, be sure to attach the “container_label_” string before your pod name which you will give in canary analysis stage in pipeline and spinnaker will use internally to query metric data from prometheus server.
- Click on Add template under filter template section on canary configuration.
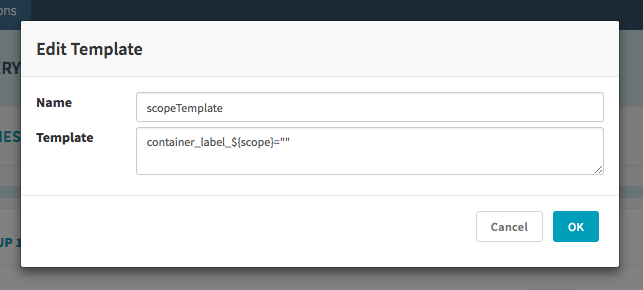
- Now, ${scope} will fill with baseline and canary version dynamically i.e. pod name of your kubernetes cluster.
- Now you are done with the canary configuration.
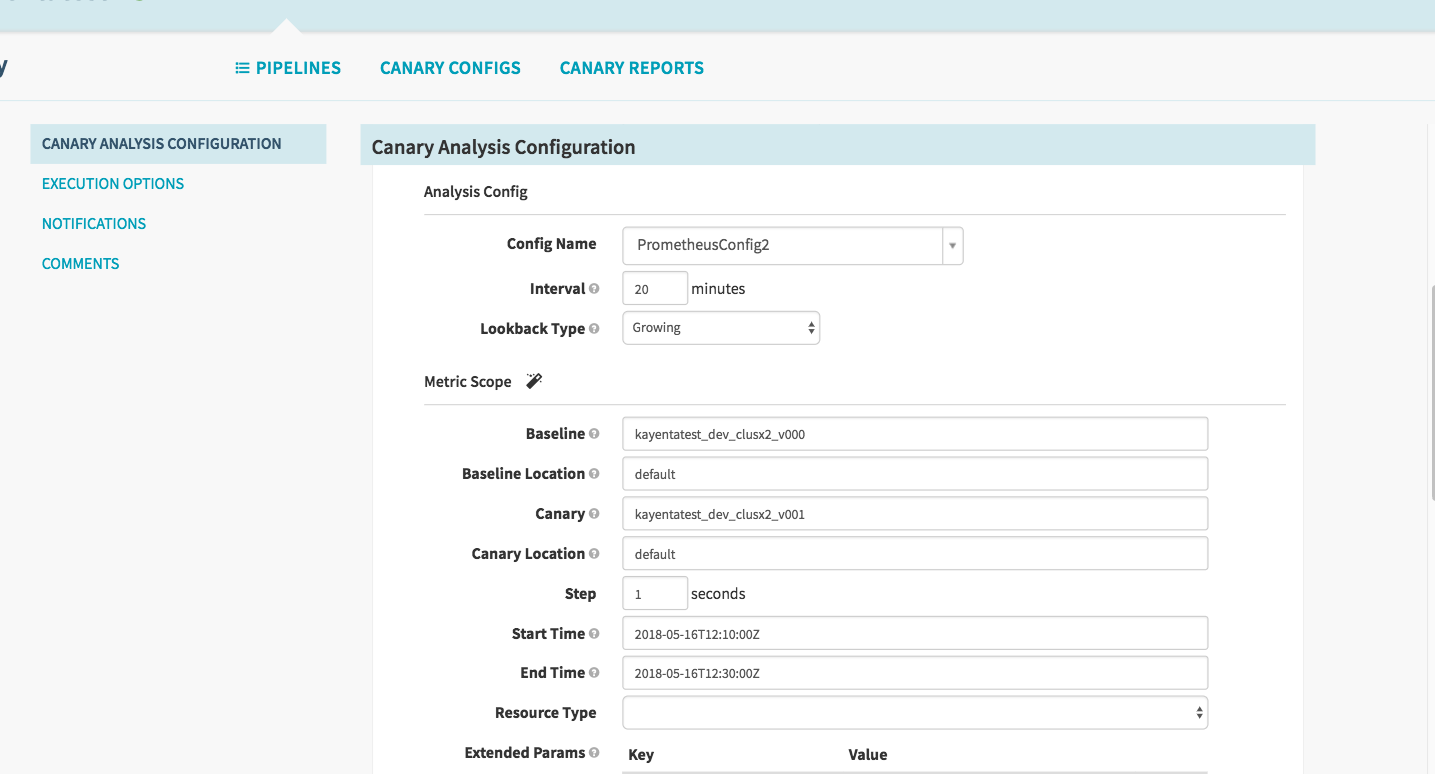
- Set up canary analysis stage in pipeline.
- Click on Pipelines > Create new pipeline. And then click on ‘Pipeline configure’. Click on ‘Add stage canary Analysis’
- Fill all the Mandatory fields in this stage, as required


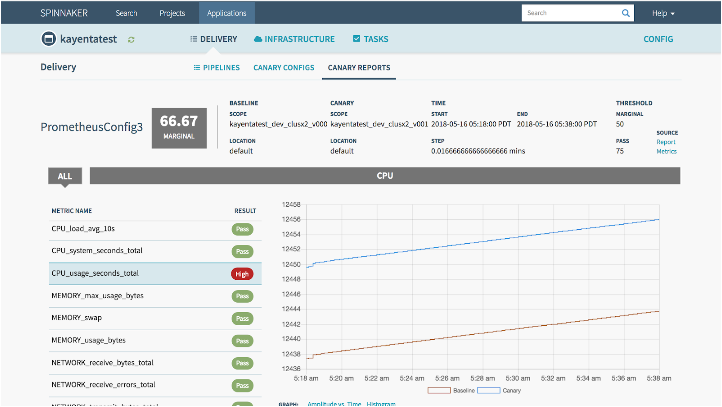
- Run the pipeline to Get scores.
- To review the Canary Scores, Over ‘Canary reports’ tab, under the ‘delivery tab’ on application page one can see the reports of metrics which we configured in the canary config.

0 Comments