Automated Analysis with Argo CD
Automated analysis is a great way to manage risk in continuous deployment and is used by large organizations like Netflix very effectively. I want to present how to get started and adopt automated analysis for your application using Argo Rollouts. This blog uses ISD Metric Provider(OpsMx), which has been developed to integrate Argo Rollout’s Automated Analysis with ISD for Verification. ISD metric provider is a proposed integration with Argo rollout, which provides automated collective analysis of infrastructure and application health. It is built as a part of the Argo rollout service, and once integrated, it will run as a part of the Argo rollout service itself.
What is Argo CD?
Defining, configuring, and managing applications declaratively and within version control is important. Achieving continuous delivery in Kubernetes should be easy, automated, and auditable. Argo CD is a declarative, GitOps continuous delivery tool. Prometheus, DataDog, NewRelic, and Wavefront track verification metrics in Argo CD. ISD is now the latest of the metric providers you can use
AI/ML is used to analyze log data, metrics, and other data sources to assess the risk of changes. It determines when an update is confident enough to advance to the next pipeline stage without introducing errors.
What is Kustomize?
Configuring Kubernetes manifests can sometimes be challenging, especially when we are trying to deploy something with pure YAML files instead of tools like helm that can do that job for you. Kustomize is a template-free declarative approach that largely simplifies Kubernetes configuration management.
Installing Kustomize is quite straightforward, and this documentation on the official Kustomize website can help you get started. Alternatively, since 1.14, Kubectl also supports the management of Kubernetes objects using a kustomization file. For more information on using kubectl to run kustomize, visit the official documentation here
I will use a minikube cluster for this demo, but you can use any Kubernetes cluster to replicate the same.
Why Kustomize?
Kustomize is highly reusable. The basic manifests that are created to deploy the application can be used many times over in all environments(development, staging, production). It is especially easy to debug as you can always compare it with the base configuration to pinpoint the differences.
It’s also Kubernetes native, which means it requires no additional dependency, and as a plain YAML-based solution, it’s not complex, making it configurable quickly.
1. Creating Rollout specification in Github
As always, it all starts with defining an application. First let’s set up a rollout.yaml and analysis template for our analysis.
Rollout.yaml
					apiVersion: argoproj.io/v1alpha1
kind: Rollout
metadata:
 name: agrotest
spec:
 replicas: 3
 revisionHistoryLimit: 2
 selector:
   matchLabels:
     app: agrotest
 template:
   metadata:
     labels:
       app: agrotest
   spec:
     containers:
       - name: rollouts-demo-exp
         image: opsmxdev/issuegen:v3.0.6
         imagePullPolicy: Always
         ports:
           - containerPort: 8088
 strategy:
   canary:
     steps:
       - setWeight: 20
       - pause: { duration: 31s }
       - experiment:
           analyses:
             - name : testapps
               requiredForCompletion: true
               templateName: testapps
           templates:
             - name: baseline
               specRef: stable
             - name: canary
               specRef: canary
Template.yaml
					apiVersion: argoproj.io/v1alpha1
kind: AnalysisTemplate
metadata:
 name: testapps
spec:
 metrics:
   - name: testapps
     provider:
       opsmx:
         gateUrl: https://ds312.isd-dev.opsmx.net/
         application: testapps
         user: admin
         lifetimeHours: "0.05"
         threshold:
           pass: 80
           marginal: 60
Let us create a github repository with the above two manifests, this repo will be used in creation of the application in argo CD. You can access the link to the repository for this exercise here
2. Deploy and sync it in the Argo CD
With the initial manifests ready, we can get started with the application deployment with Argo CD.
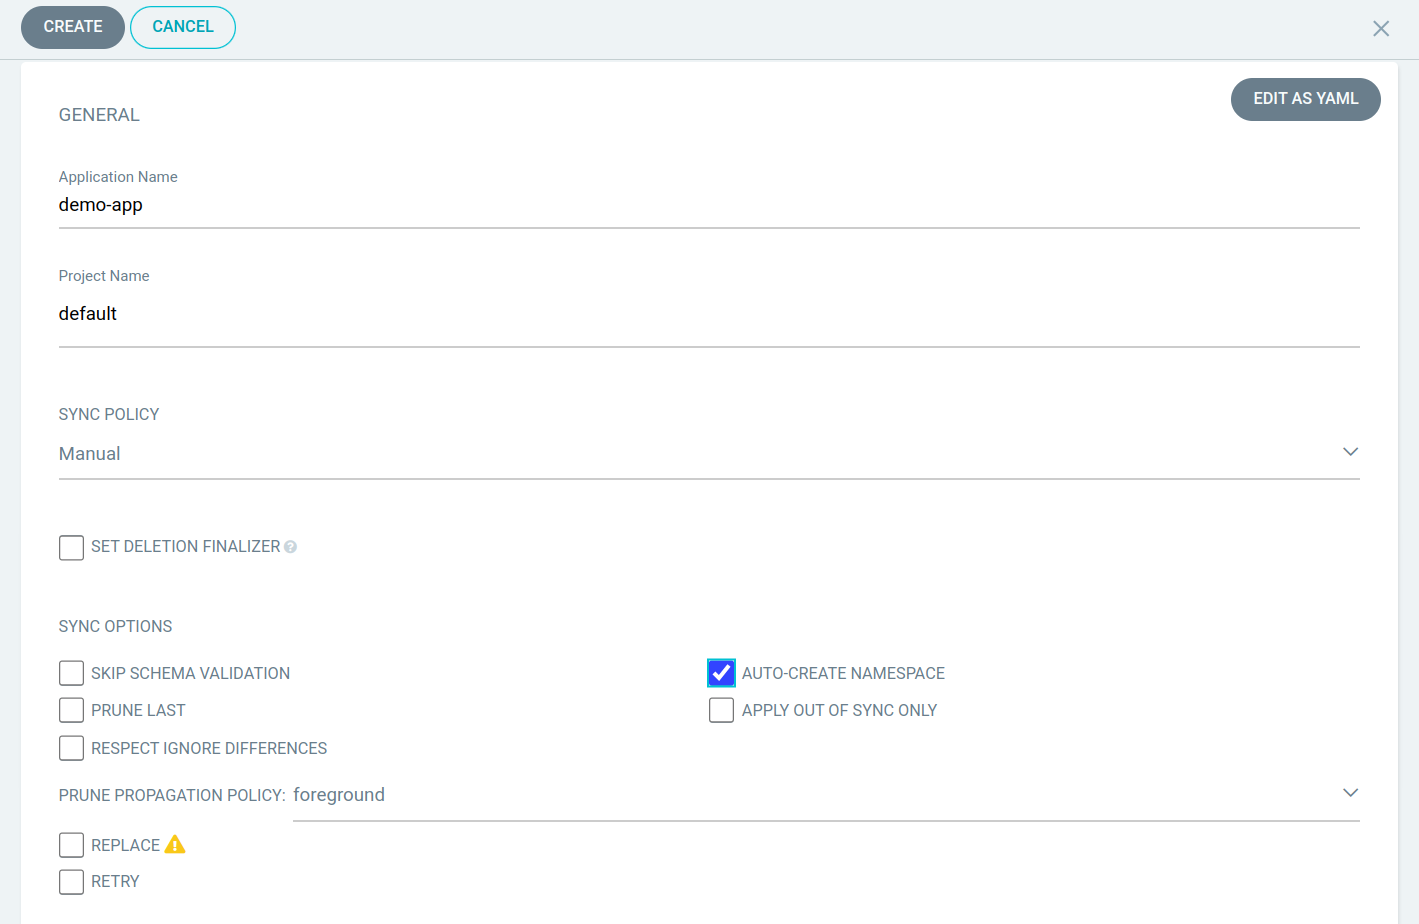
To start, click the NEW APP button to create the application and fill the fields as shown below.
Application Name – This is a unique identifier of your application inside Argo CD, for this tutorial ‘demo-app’ is the name of the application.
Project – Applications with the same project name will be grouped together, for now I will be using default value
Sync policy – For the time being we will be going with the manual sync policy to have more control over the sync process but Argo CD is powerful enough to have its own auto sync policy, more info on it can be found in official documentation https://argo-cd.readthedocs.io/en/stable/user-guide/auto_sync/
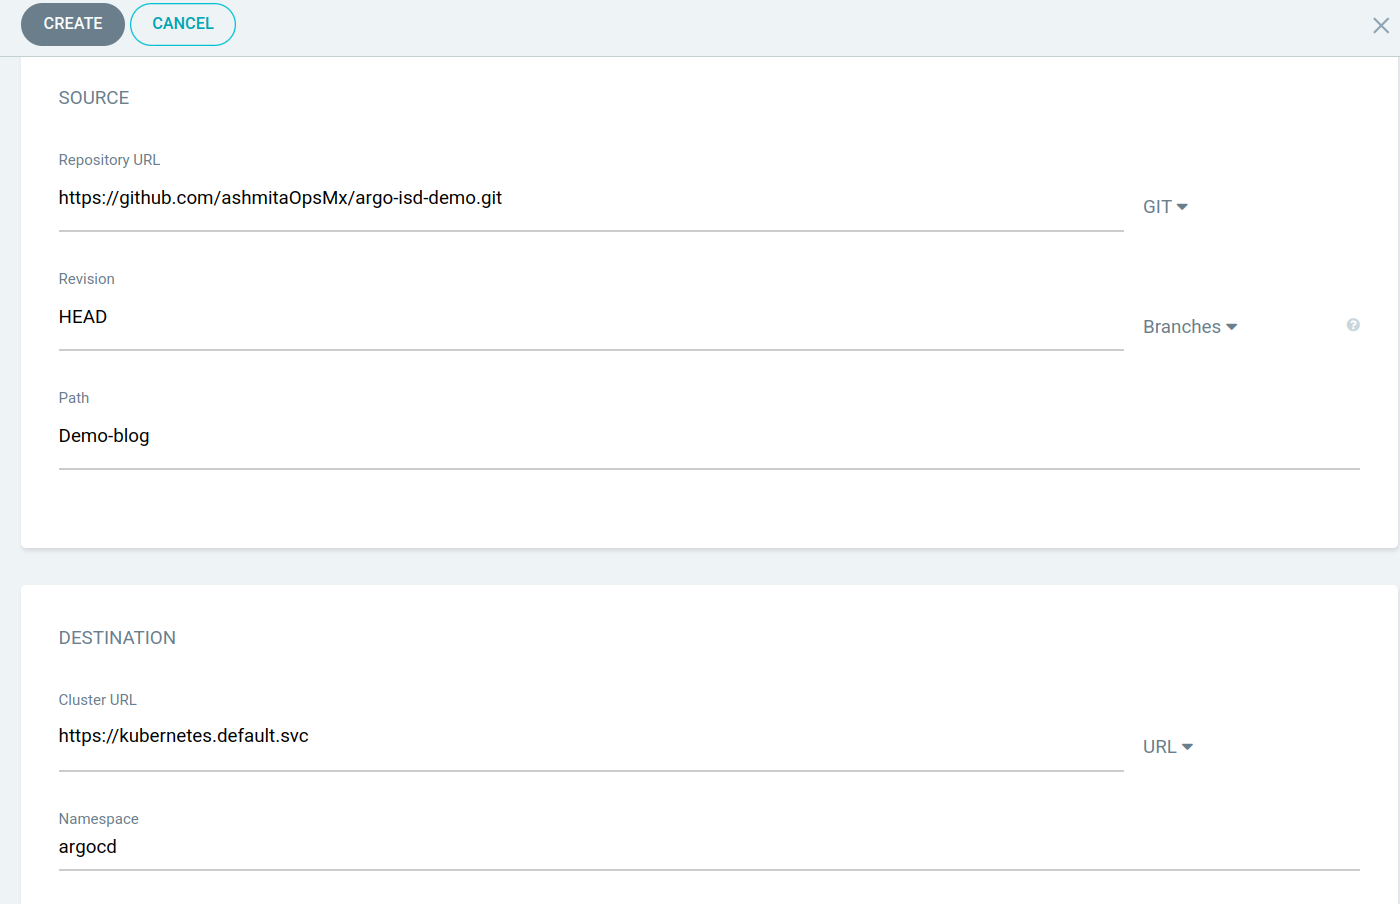
Repository URL : Here we would have to provide the repo URL containing our manifests, in case you are using a private repository further authentication might be required but we will be using a public repository for this tutorial.
Revision and Path : Revision field is used to provide a specific tag or branch name, we will be using HEAD as it has all latest commits. Path refers to the specific folder in the repository which contains application manifests
Cluster URL : Argo CD will require the target URL of the cluster where the application will be deployed, in our case its the default cluster.
Namespace : This refers to the specific namespace in the cluster where the application will be deployed.
Note : There is an option to automatically create a namespace in case there is no namespace separately created for the application.
You can do this by checking the AUTO-CREATE-NAMESPACE check box in the sync options. This will create a namespace for your application, in this case you can fill the value of namespace as ‘default’.
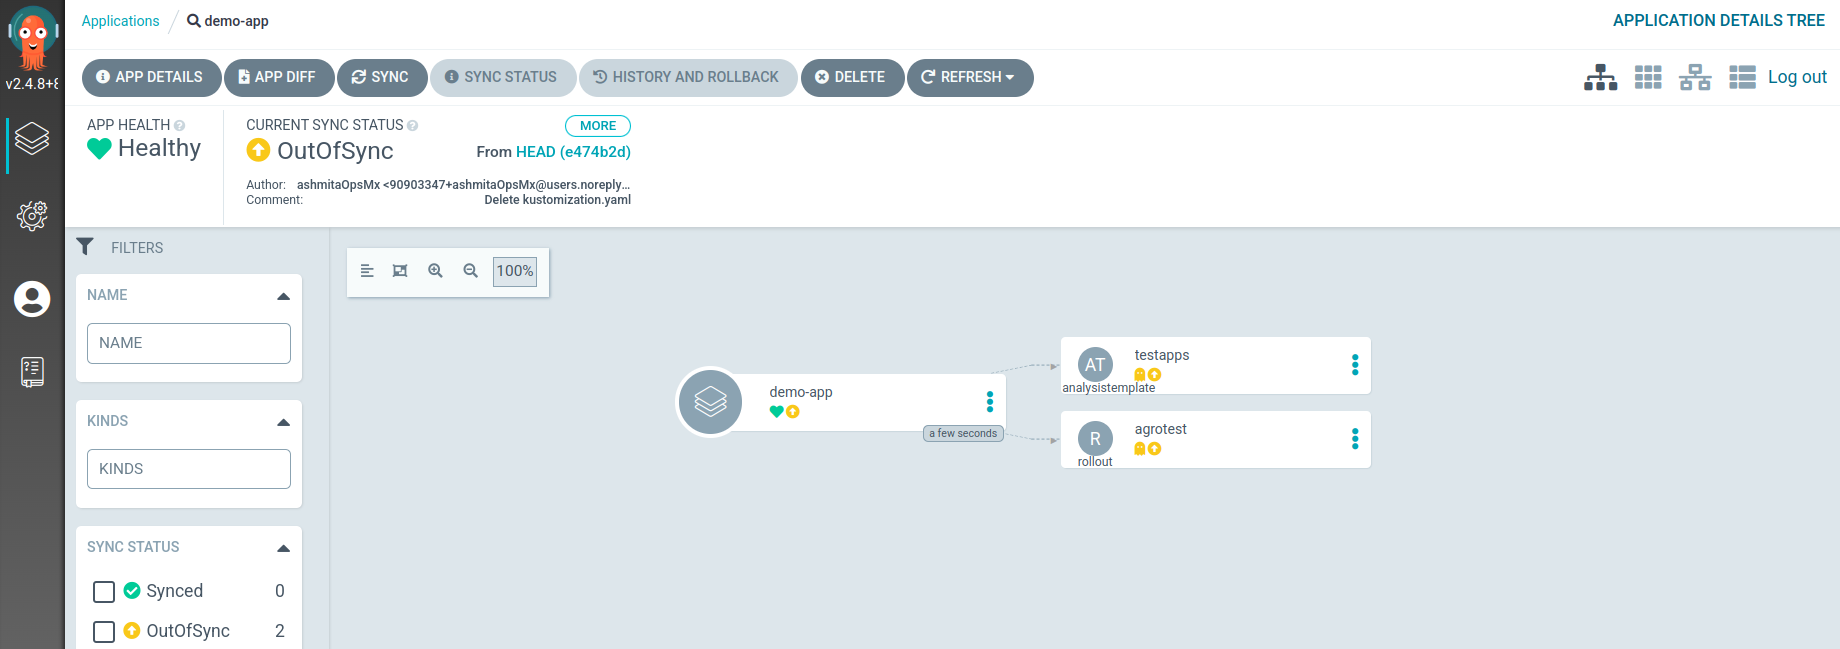
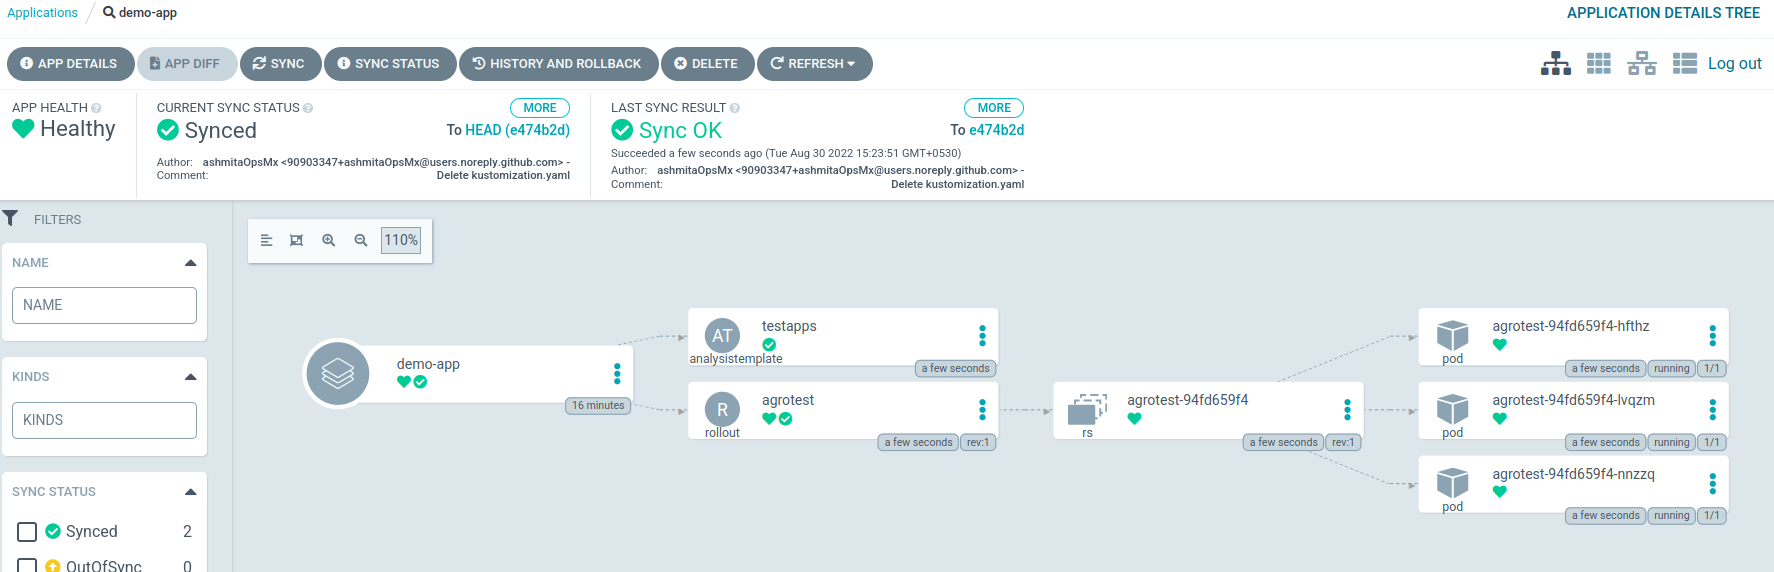
After filling out these details, scroll to the top and click on create. Go back to the applications page and you will see an application called ‘demo-app’ to be created which will be out of sync for now.
After clicking on the application you will be met with the below screen.
To sync the application click on the SYNC button that will give us the below screen
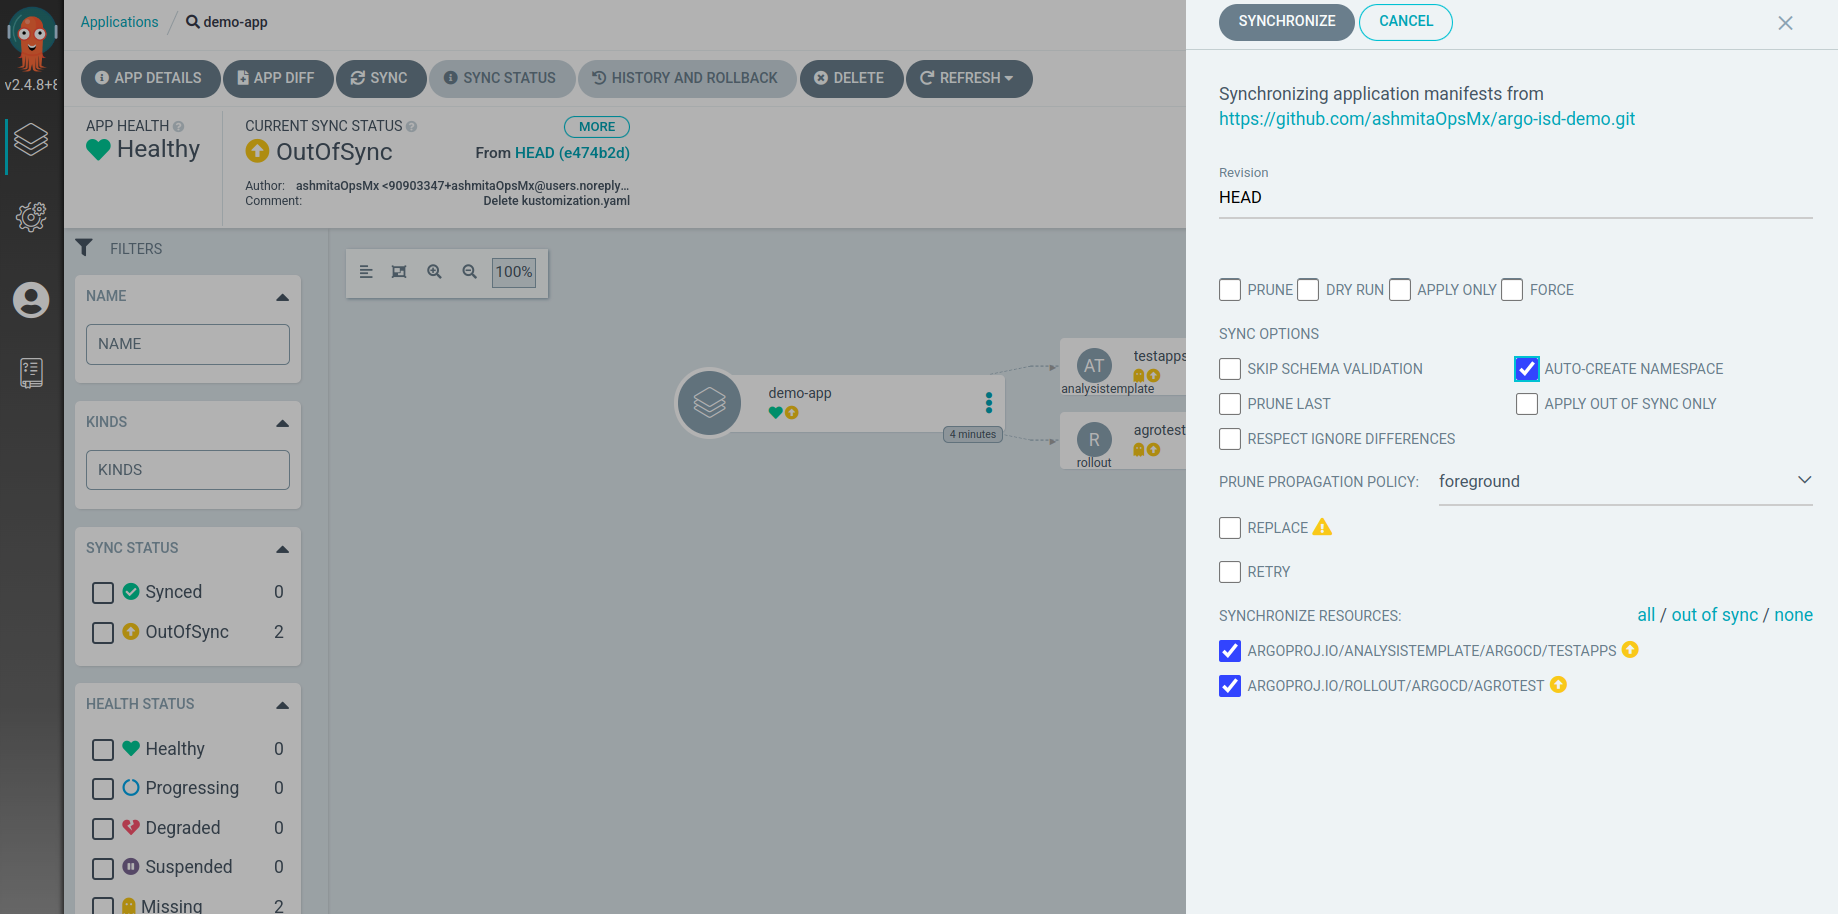
Leave the default settings and click on the SYNCHRONIZE button, to deploy the application in our namespace, after the syncing process is finished, you should see something like this.
3. Bringing it all together: Creating Kustomization.yaml
Now that the application is deployed, it’s time to create our kustomization.yaml file
Kustomization.yaml
					apiVersion: kustomize.config.k8s.io/v1beta1
kind: Kustomization

resources:
 - rollout.yaml
 - template.yaml
 images:
- name: opsmxdev/issuegen
 newTag: v3.0.6
 namePrefix: opsmx-

commonLabels:
 owner : purushotham
Before we proceed further, let’s review the YAML configuration to understand what is being done here. We have added the rollout.yaml and template.yaml as resources here; this indicates we are customizing the manifests for these two manifests. For now, the image is the same as given in the rollout.yaml but this will be changed later. We have added a prefix’ opsmx-‘ in the namePrefix field; this means each resource mentioned will be prefixed with the value. Finally, a field as an owner will be added as part of the resources mentioned.
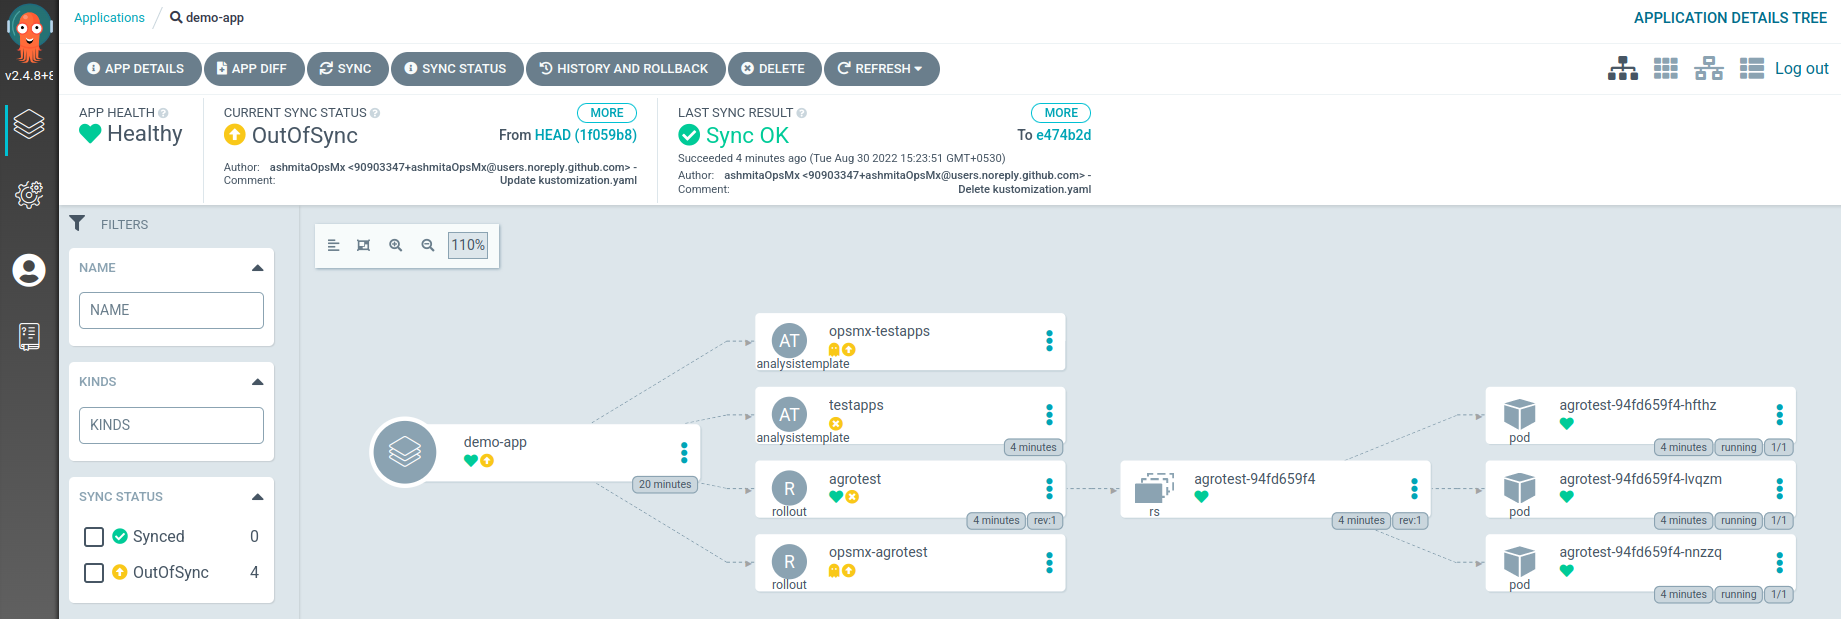
The first obvious change we see is that there is another set of our resource manifests that are prefixed with the value we gave in kustomization.yaml, this can be useful in case we have a dev, prod, and test environment and each of them can have their manifests built using this.
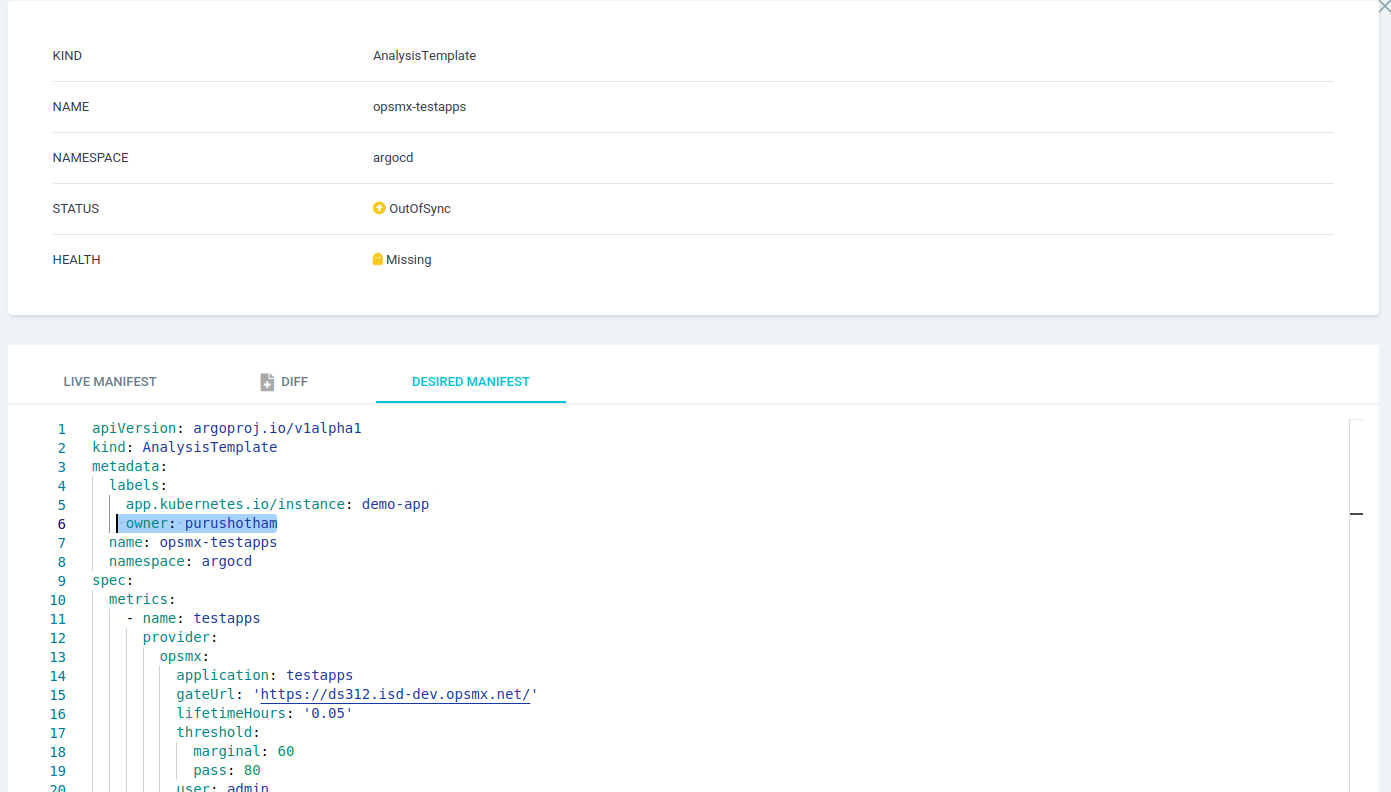
If we select any new resources and look at the live manifests, we will notice that a new field, ‘owner’ has been added.
This means without any extra commands, Argo CD was automatically able to detect a change in the repository and was able to build manifests based on the kustomize.yaml configuration without making any changes to the original resources.
4. Triggering the Analysis
Before we trigger the analysis, ensure that we create an application in ISD with a verification gate added and a template configured along with the desired metrics. The application name has to be added in both rollouts and analysis templates. In my case, I created an application called ‘testapps’ and configured a Prometheus metric in the template.
					apiVersion: argoproj.io/v1alpha1
kind: AnalysisTemplate
metadata:
 name: testapps
Now that we know that kustomization is working and we have a working application in the ISD platform with a template, we can finally trigger an analysis!
Triggering an analysis is very simple. We just have to change the image in the kustomization.yaml, as shown below.
					apiVersion: kustomize.config.k8s.io/v1beta1
kind: Kustomization
resources:
 - rollout.yaml
 - template.yaml
 images:
- name: opsmxdev/issuegen
 newTag: v3.0.8
 namePrefix: opsmx-
commonLabels:
 owner : purushotham
As we added a prefix to all our resources including the template we have to change the reference to the template in rollout.yaml in the strategy section in the template name.
					strategy:
   canary:
     steps:
       - setWeight: 20
       - pause: { duration: 31s }
       - experiment:
           analyses:
             - name : testapps
               requiredForCompletion: true
               templateName: opsmx-testapps
           templates:
             - name: baseline
               specRef: stable
             - name: canary
               specRef: canary
That’s all the changes required to trigger an analysis, lets us go back to the Arog CD to trigger the analysis.
After hitting the REFRESH button in the Arog CD button, we will notice that the application is out of sync. Click on the SYNC button and select the PRUNE option this time before hitting SYNCHRONIZE to remove older resources that no longer exist.
Note: To revert back to the previous setup all we need to do is remove the kustomization.yaml file and change back the template name, hit REFRESH and SYNC.
After clicking on the SYNCHRONIZE option we will see the analysis being processed.
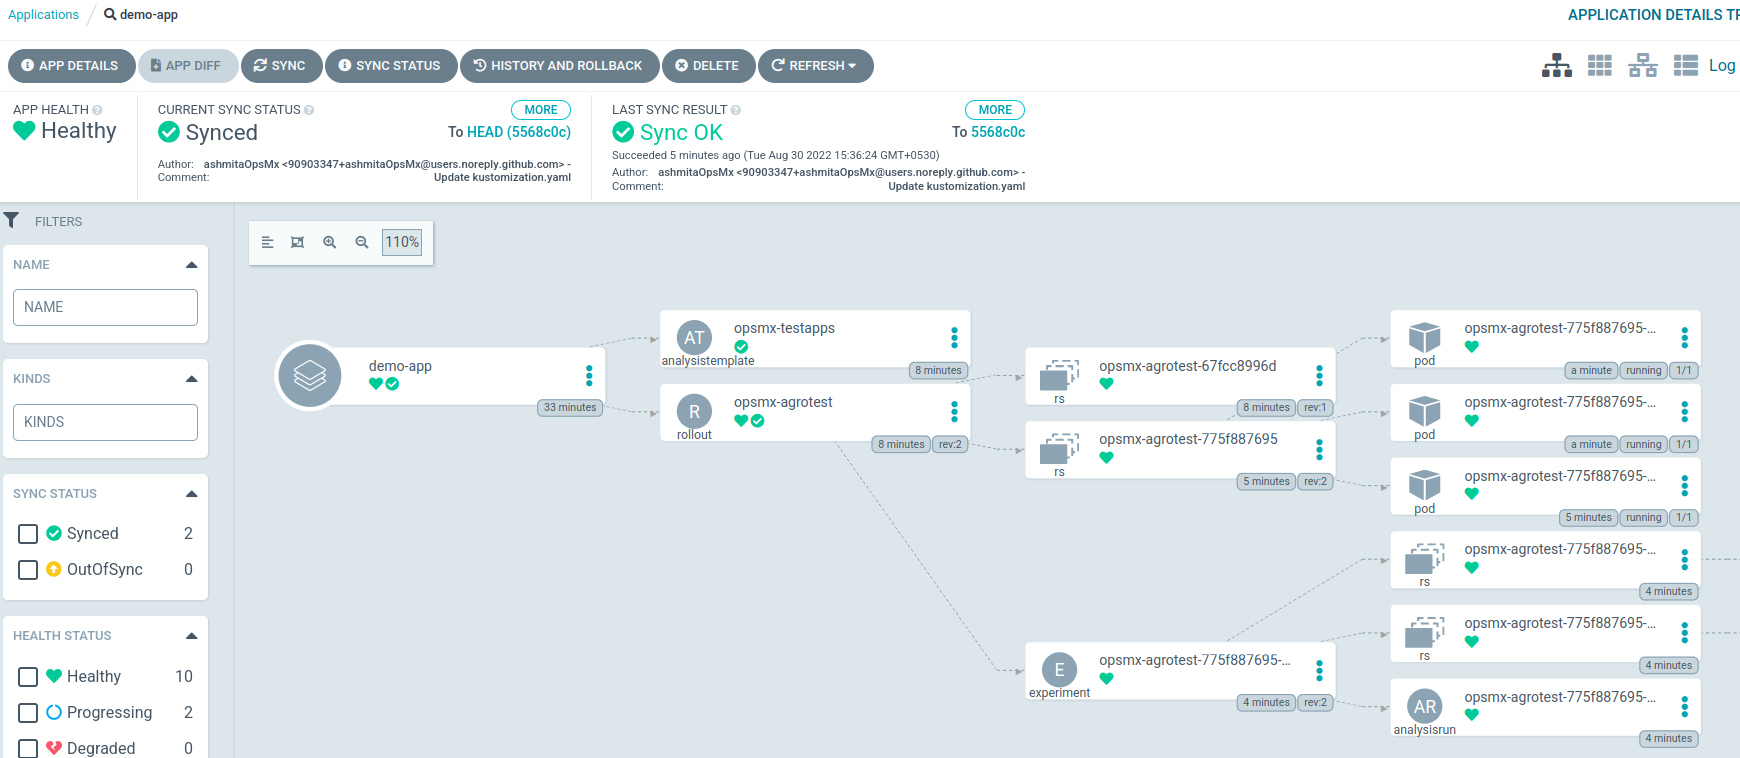
Right now, an experiment is being processed. As part of the experiment, we are running an ISD analysis for a metric that is monitoring baseline and canary instances deployed in the cluster.
The experiment has a pause step, so don’t be worried if we see SUSPENDED as the status because this is expected. After the pause step, the analysis will resume on its own. The analysis duration depends on the lifetime hours given since we did not explicitly mention any start time. It will assume the start time of the analysis as the current time.
5. Conclusion
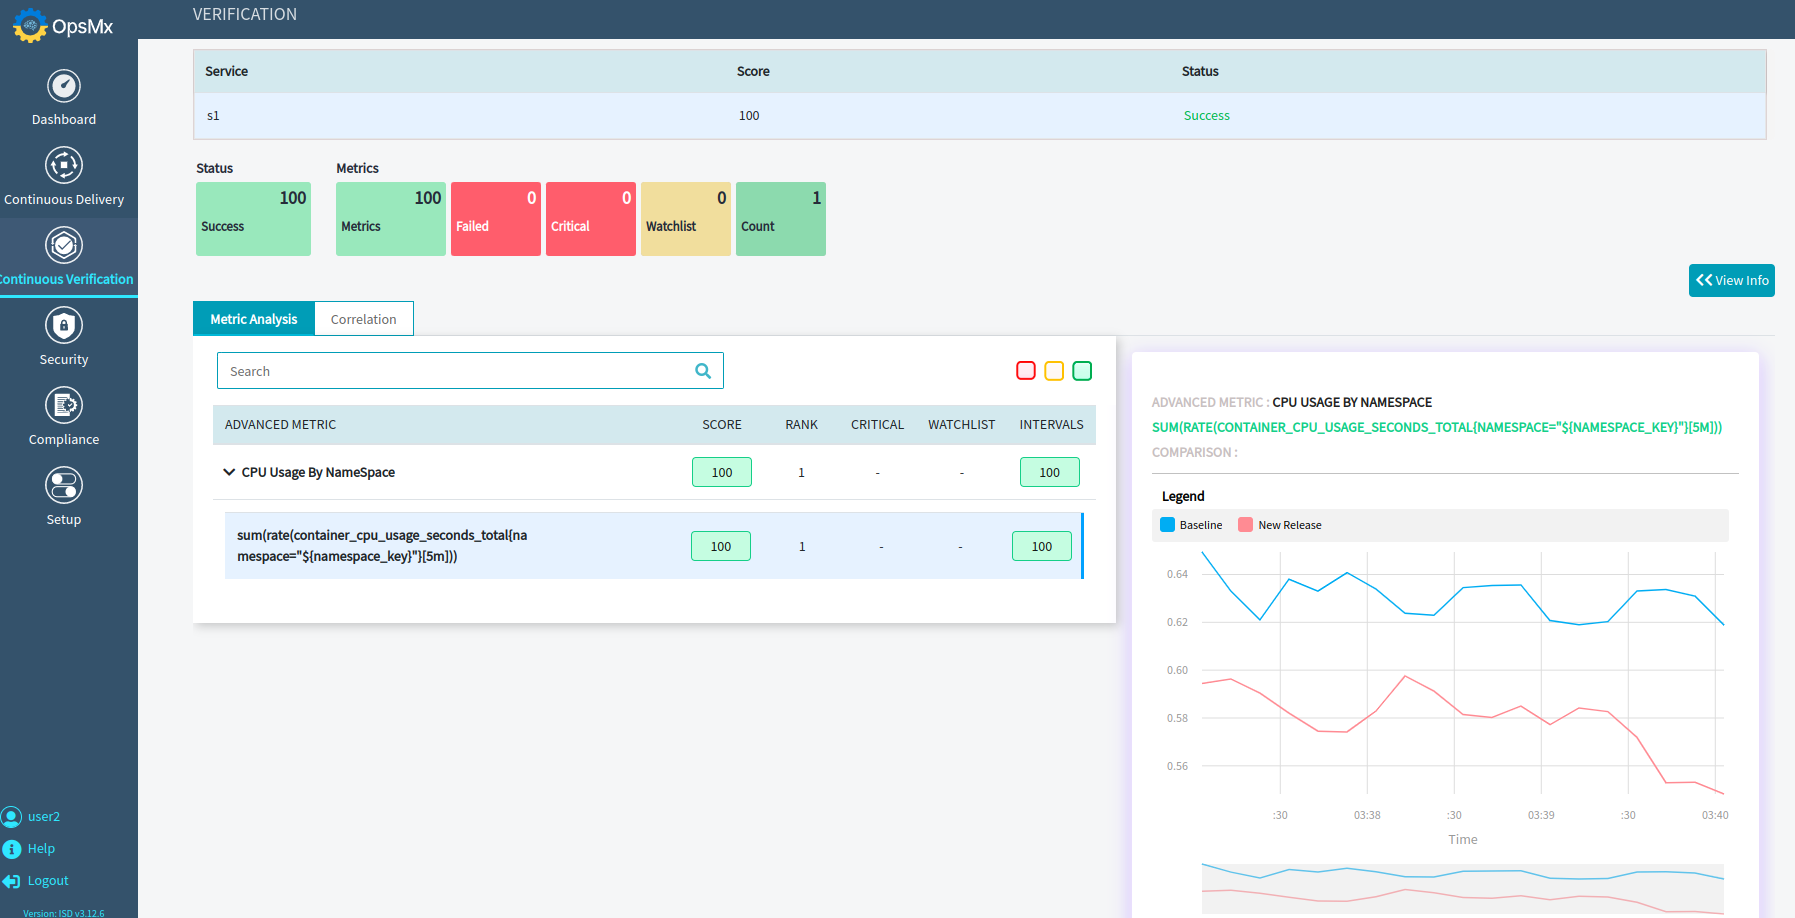
After the analysis is complete, you can access the analysis result in the analysisrun manifest as shown below.
The analysis report link will also be in the analysisrun using which you can access the analysis report. As we can see below the analysis passed which is why we were successfully able to deploy the application in our kubernetes cluster.
With the OpsMx delivery intelligence for Argo Rollouts, developers and SREs can prevent production errors, enhance security, quality, and compliance.
The delivery intelligence module is a part of OpsMx ISD for Argo, that helps enterprises to automate release verification processes during progressive delivery in Argo Rollouts. This module leverages AI/ML to assess a new deployment’s logs and metrics and estimate the performance, security, and reliability scores.
 to obtain a blueprint of implementing successful advanced deployment strategies for your Argo driven deployments!
About OpsMx
Founded with the vision of “delivering software without human intervention,” OpsMx enables customers to transform and automate their software delivery processes. OpsMx builds on open-source Spinnaker and Argo with services and software that helps DevOps teams SHIP BETTER SOFTWARE FASTER.
0 Comments