
Spinnaker has some quirks when enabled for LDAP authentication, especially the login URL. When deploying Spinnaker using the published Helm chart, the Spinnaker microservice, the gate is available on /gate on deck. But the login URL gets routed to /login and after successful login, it gets routed to /auth/redirect instead of being relative to the gate base URL! The setup works very well when you have a static hostname that can be directed to deck or gate depending on the port being 9000 or 8084. And you set the base URL for deck and gate accordingly. But then you need to get that static hostname setup and your load balancer configured. Or, you have to use localhost with port forwarding but then it is only available to you! This tutorial provides an alternative using the Kubernetes ingress controller without the need for a static hostname and a load-balancer.
From Google Cloud console, set up a managed Kubernetes cluster. For this exercise, set up the cluster with at least 3 nodes of type n1-standard-2. And we would name the cluster my-spinnaker.
It is recommended to use the Google Cloud Shell to run the commands used in this tutorial. Otherwise, you will need to install the tools being used in your environment first.

This will give you a shell at the bottom of the browser window. Authenticate your shell against the Kubernetes cluster you just created.
gcloud container clusters get-credentials my-spinnaker --region us-central1-a
Initialize Helm
Helm is used to deploying resources into the Kubernetes cluster. You need to initialize Helm in your cluster before you can use it to deploy Helm charts.
					kubectl create serviceaccount -n kube-system tiller
kubectl create clusterrolebinding tiller-binding --clusterrole=cluster-admin --serviceaccount kube-system:tiller
helm init --service-account tiller --wait
Deploy Spinnaker
We will install Spinnaker using the published stable Helm chart. But before that, we would like to configure the deployment. Let’s get the values file first to customize the deployment.
wget https://raw.githubusercontent.com/helm/charts/master/stable/spinnaker/values.yaml
Edit the section additionalProfileConfigMaps in downloaded values.yaml as shown below:
					additionalProfileConfigMaps:
     data:
       ## if you're running spinnaker behind a reverse proxy such as a GCE ingress
       ## you may need the following profile settings for the gate profile.
       ## see https://github.com/spinnaker/spinnaker/issues/1630
       ## otherwise its harmless and will likely become default behavior in the future
       ## According to the linked github issue.
       gate-local.yml:
         server:
           tomcat:
             protocolHeader: X-Forwarded-Proto
             remoteIpHeader: X-Forwarded-For
             internalProxies: .*
             httpsServerPort: X-Forwarded-Port
Also, update the additionalServiceSettings section as shown below:
					additionalServiceSettings:
   gate.yml:
     healthEndpoint: /health
     kubernetes:
       useExecHealthCheck: false
Save the values.yaml file and Now deploy your Spinnaker.
helm install -n spinnaker stable/spinnaker -f values.yaml
Give it some time. Once all the pods are running, your Spinnaker is deployed and ready to use.
					$ kubectl get pods
NAME                                READY   STATUS      RESTARTS   AGE
spin-clouddriver-749d9c9589-wg49j   1/1     Running     0          11m
spin-deck-775cdfccff-shzcb          1/1     Running     0          11m
spin-echo-5fd76b8f79-fkdm9          1/1     Running     0          11m
spin-front50-597b4ff46d-72kxr       1/1     Running     0          11m
spin-gate-7dc88df658-xl8nm          1/1     Running     0          11m
spin-igor-67b9b4c66-zs28q           1/1     Running     0          11m
spin-orca-7d5958f8d6-c6w7x          1/1     Running     0          11m
spin-rosco-67847b657b-gx5vc         1/1     Running     0          11m
spinnaker-install-using-hal-mdt4q   0/1     Completed   0          14m
spinnaker-minio-5c994565d6-fjdkm    1/1     Running     0          14m
spinnaker-redis-master-0            1/1     Running     0          14m
spinnaker-spinnaker-halyard-0       1/1     Running     0          14m
Your Spinnaker is deployed but how do you access it? You could always create port-forwards as mentioned in the output of the helm command you used to deploy Spinnaker. But that works when you are using your local laptop. The best option to make it always available and to others is to create Kubernetes services to Spinnaker gate and deck components and then an ingress in Kubernetes to expose Spinnaker.
Create a file spinsvcs.yml that will be used to create Spinnaker services.
					apiVersion: v1
kind: Service
metadata:
   labels:
     app: spin
     stack: gate
   name: spin-gate-np
spec:
   type: NodePort
   ports:
   -  name: http
      port: 8084
      protocol: TCP
   selector:
     cluster: "spin-gate"
---
apiVersion: v1
kind: Service
metadata:
   labels:
     app: spin
     stack: deck
   name: spin-deck-np
spec:
   type: NodePort
   ports:
   -  name: http
      port: 9000
      protocol: TCP
   selector:
     cluster: "spin-deck"
Create a file ingress.yml that will be used to create an ingress to Spinnaker.
					apiVersion: extensions/v1beta1
kind: Ingress
metadata:
  labels:
    app: spinnaker
  name: spinnaker-ingress
spec:
  backend:
    serviceName: spin-deck-np
    servicePort: 9000
  rules:
  - http:
      paths:
      - path: /login
        backend:
          serviceName: spin-gate-np
          servicePort: 8084
      - path: /auth/*
        backend:
          serviceName: spin-gate-np
          servicePort: 8084
Run the commands to create the services and ingress.
					kubectl apply -f spinsvcs.yml
kubectl apply -f ingress.yml
You are ready to try launch Spinnaker when the backend services are green for the ingress (give it a few minutes).
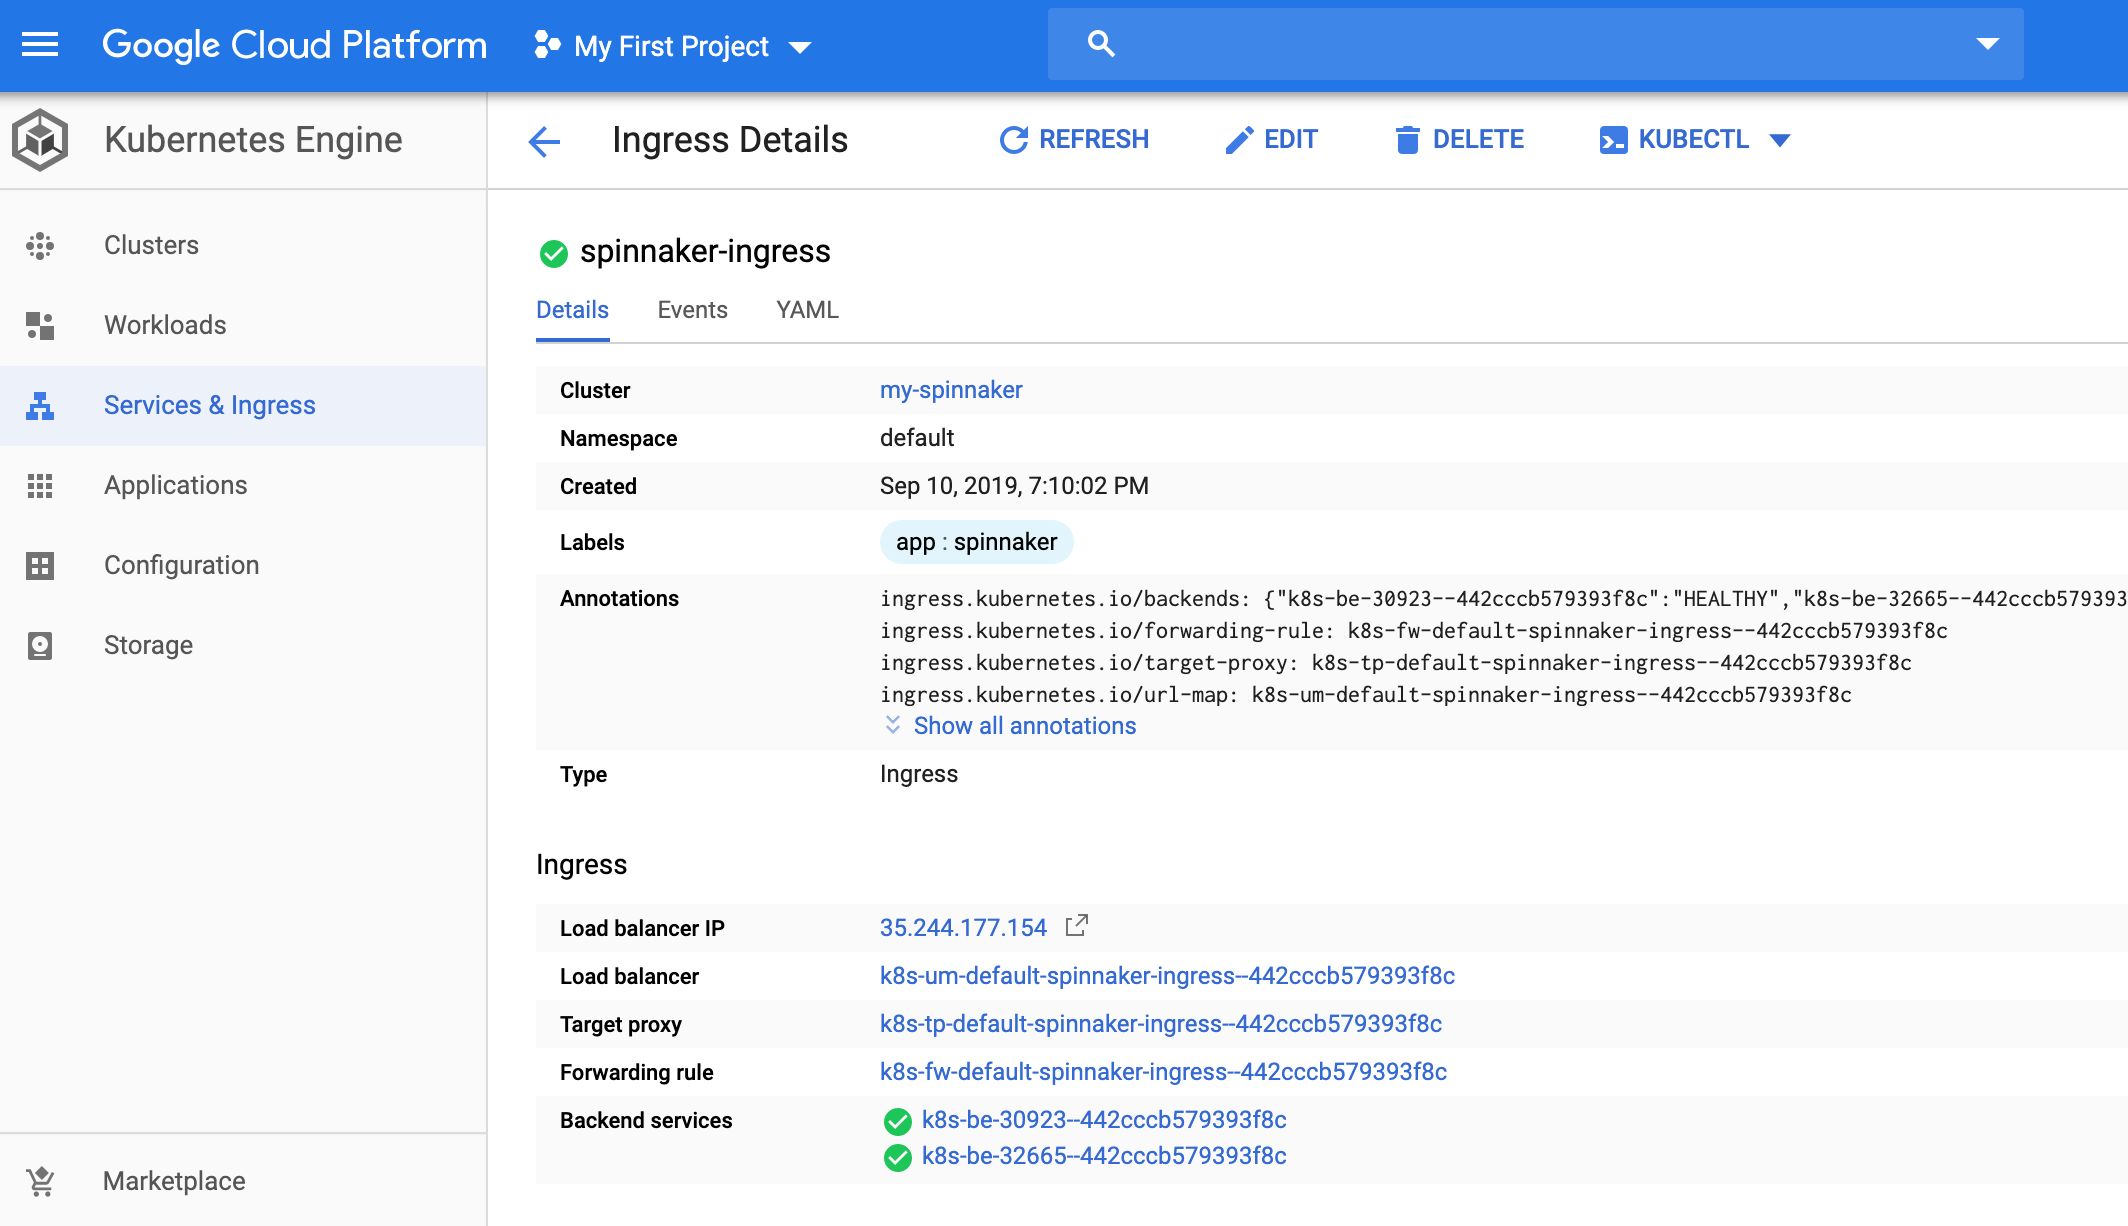
Note the Load Balancer IP on the page. You can now use Spinnaker by clicking on that. Now, let’s go and secure this setup with LDAP based authentication.
Deploy OpenLDAP for LDAP Authencation
We will use OpenLDAP as the LDAP provider in this tutorial. Use helm to install OpenLDAP.
helm install --name openldap stable/openldap
You can always configure the base dn and other attributes of the OpenLDAP. Out of the box, it sets up with a base dn of dc=example,dc=org. You can get the password of the admin user using
kubectl get secret --namespace default openldap -o jsonpath="{.data.LDAP_ADMIN_PASSWORD}" | base64 --decode; echo
Configure Spinnaker to use OpenLDAP for LDAP Authentication
First, you need to connect to the halyard pod in Spinnaker.
kubectl exec -it spinnaker-spinnaker-halyard-0 bash
Next, configure and enable authentication in Spinnaker.
					hal config security authn ldap edit --user-dn-pattern="cn={0}" --url=ldap://openldap.default:389/dc=example,dc=org
hal config security authn ldap enable
The deck base URL also needs to be updated to the ingress host (replace the 35.244.177.154 with the ip address of load-balancer of the ingress).
hal config security ui edit --override-base-url http://35.244.177.154
Now, apply the configuration to Spinnaker.
hal deploy apply
Once the deployment is successful, you can reload the Spinnaker UI you had launched earlier. You should be redirected to a login page. Login with admin and the password for the admin user in LDAP.
So in this article, we have shown you how to configure and use OpenLDAP for LDAP authentication for Spinnaker deployments to GKE. If you wish to streamline your Continuous Delivery, learn about different Spinnaker authentication methods please read the following articles:
- Implementation of Basic Authentication for Prometheus and Alertmanager
- Authentication for Spinnaker Services using x509 client certificate
- How to set up Mutual TLS (mTLS) Authentication for Spinnaker Services
- Configuring Spinnaker Authentication with Azure Active Directory
- SAML Authentication on Spinnaker using GSuite
- Spinnaker Authorization setup using GSuite
If you want to know more about the Spinnaker or request a demonstration, please book a meeting with us.
OpsMx is a leading provider of Continuous Delivery solutions that help enterprises safely deliver software at scale and without any human intervention. We help engineering teams take the risk and manual effort out of releasing innovations at the speed of modern business. For additional information, contact us
0 Comments
Trackbacks/Pingbacks