
1.2. A running Spinnaker instance
You need to have a running Spinnaker instance on Kubernetes.
2. Configure CI/CD Pipeline in GitLab
2.1. Set Up Continuous Integration Pipelines with GitLab CI
We need to create a new project and define a repository with ‘.gitlab-ci.yml’ file. The GitLab CI/CD pipelines are configured using a YAML file called .gitlab-ci.yml within each project. This file automatically runs whenever we push a commit to the server. For example, we will create a new project in GitLab containing the example Node.js application. We will import the original repository directly from GitHub so that we do not have to upload it manually. Log into GitLab and click the plus icon in the upper-right corner and select New project to add a new project:

Add New Project in GitLab
On the new project page, click on the Import project tab:

Import project
Next, click on the Repo by URL button. Although there is a GitHub import option, it requires a Personal access token and is used to import the repository and additional information. We are only interested in the code and the Git history, so importing by URL is easier.
In the Git repository URL field, enter the following GitHub repository URL: https://github.com/do-community/hello_hapi.git
It should look like this:

Insert GitHub repository URL
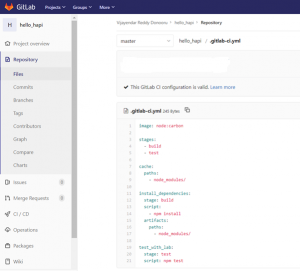
GitLab CI looks for a file called .gitlab-ci.yml within each repository to determine how it should test the code. The repository we imported has a gitlab-ci.yml file already configured for the project.
Click on the .gitlab-ci.yml file in the GitLab interface for the project we just created. The CI configuration should look like this:

GitLab CI configuration
Since our repository includes a .gitlab-ci.yml file, any new commits will trigger a new CI run.
2.2. Triggering GitLab build CI/CD pipelines from Spinnaker through the API
Adding a new trigger
We can add a new trigger by going to the project’s Settings ➔ CI/CD under Pipeline Triggers. The Add trigger button will create a new token which we can then use to trigger a rerun of this particular project’s pipeline. Every new trigger we create gets assigned a different token which we can then use inside your scripts or .gitlab-ci.yml. We also have a nice overview of the time the triggers were last used. In our case, this token is used with Webhook URL which can be provided in Spinnaker pipeline configuration during the Custom Webhook stage.

Add New Trigger for CI/CD pipeline

Use the generated token with Webhook URL
3. Configure a GitLab Custom Webhook Stage
Custom Webhook Stages provide a simple, yet powerful, way of adding custom stages to Spinnaker. These stages are typically used to make quick API calls to an external system as part of a pipeline. Instead of extending the various components through code, users can simply add configuration to Orca for these stages. They appear in the UI as if they were a native stage.
3.1. Creating a Custom Webhook Stage
To create a custom webhook stage, we need to add configuration for the stage in ‘orca-local.yml’ available at ‘/opt/orca/config/’. The ‘webhook. preconfigured’ property supports configuring multiple webhook stages.
3.2. Configuring parameters for Custom Webhook Stage
We can also configure parameters for Custom Webhook Stages. These Custom webhook parameters allow variables to be used within the custom stages. These parameters are rendered in the UI and let users of your stage set them as necessary. When the stage executes, the values of these parameters are evaluated using SpEL which means that they can be dynamic in nature. Add the following configuration in ‘orca-local.yml’ to create a custom webhook stage with parameters: Given name for the stage: GitLab – GitLab Custom Webhook Parameters used in Webhook URL are: Project ID and GL Webhook Token for my GitLab project-id and token resp.

Configure parameters in Spinnaker for Custom Webhook Stages in Spinnaker CI/CD pipelines
4. Configure Spinnaker CI/CD pipeline Stage
The Custom Webhook Stages will be added to the list of stages within the Pipeline editor. We can add these stages as we would do any other stage. Select the stage named, ‘GitLab – GitLab Custom Webhook’ and enter the values for configured parameters,’GL Webhook Token’ & ‘Project ID’ as shown below.

Configure Spinnaker CI/CD pipeline for the Custom Webhook Stage
The value of these properties can be accessed via SpEL within various attributes of the webhook configuration. For example, if we built a stage for triggering a build pipeline in GitLab, we could use the properties, ‘gitToken’ & ‘projectId’ for Project-ID and trigger pipeline token and reference their values by using SPeL within our webhook URL.
5. Verification of the build CI/CD pipeline triggered in GitLab from Spinnaker
1. Execute the Spinnaker pipeline manually and check the status as shown below:

Verify the Spinnaker CI/CD pipeline that triggers GitLab build
2. And ensure the build pipeline is triggered in GitLab -> CI/CD -> Pipelines as shown below:

Verify that the build Spinnaker CI/CD pipeline is triggered in GitLab
If you want to know more about the Spinnaker or request a demonstration, please book a meeting with us.
In case you want visibility and insights into the Spinnaker deployments across clusters and clouds, then try an application dashboard for Spinnaker CD.
For implementing security and policies around deployment pipelines and software delivery, please check policy and governance in Spinnaker.
OpsMx is a leading provider of Continuous Delivery solutions that help enterprises safely deliver software at scale and without any human intervention. We help engineering teams take the risk and manual effort out of releasing innovations at the speed of modern business. For additional information, contact us
0 Comments